
Integrating your business email with Microsoft outlook is often helpful as it allows easy and convenient access to hosted email inboxes.
For this tutorial Outlook 2013 will be used. Let’s begin by opening the Microsoft Outlook program.
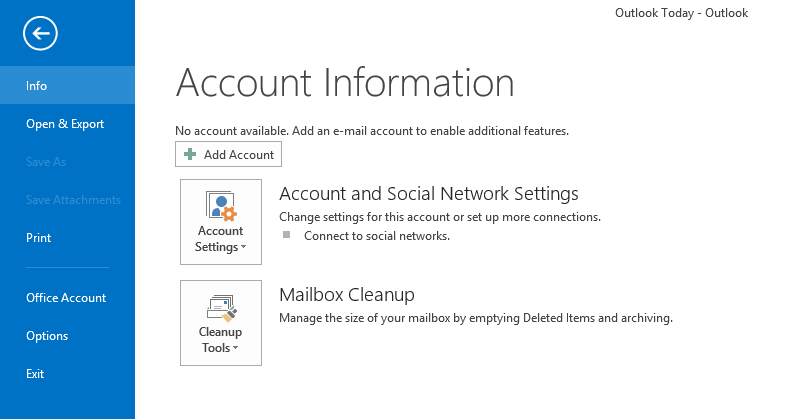
- At the top left corner of Outlook, click on the “File” button. Doing so will present the “Account Information” screen.
- We will begin linking the email inboxes associated with our domain name by clicking the “Add Account” button.
- Insure that the radio button selects “Email Account” to allow the population of the following fields.
- Populate the “Your Name,” “Email Address,” and “Password” fields. For the “Name” field, input whatever name you would like to send emails as. The “Email Address” will correspond with the email address we are attempting to link. So if you’d like to link “Websites@MyWebsiteCreated.com,” to MS Outlook, then that will be the email address you will input in the field. The “Password” field will require that you enter the password used to access that specific email account, you may change it if you don’t know it (be sure to record the new password in a safe palce.).
- After populating all the fields, select the “Manual setup or additional server types” radio button and click “next.”
- Select the radio button associated with “POP or IMAP.“
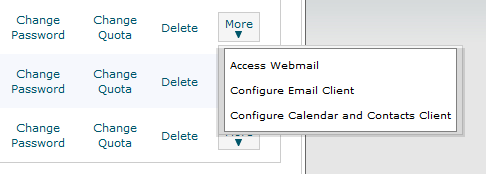
- The “Your Name” and “Email Account” fields should be pre-populated from the previous steps. Under the heading entitled “Server Information,” you will find the information by logging into your My Website Created cPanel account. Login by following this link: cPanel / Mail Login > After logging in, under the section entitled mail, click on “Email Accounts” Scroll down and find the blue “More” button associated to the email being added to outlook. > Select “Configure Email Client.”
- On the new page, scroll down until you see the section entitled “Manual Settings.“ Use the credentials found under “Secure SSL/TLS Settings (Recommended)” to populate the “incoming and outgoing mail servers” and “user name” in Outlook.
- Change “Account Type” from “POP3” to “IMAP” > Input your email “Password.” Be sure to have the “Remember Password” option checked.
- Click on the “More Settings” button > “Outgoing Server” tab, check: “My outgoing (SMTP) server requires authentication” > Keep the radio button on “Use same settings as my incoming mail server“. On the “Advanced” tab, use the encrypted “SSL” for both the outgoing and incoming ports. Reference the cPanel mail configuration for the “Server Port” numbers, again, ensure that port numbers are correct and SSL connection are set for both ports. Select “OK“